Page 5 of 8
Posted: April 29th, 2009, 5:30 am
by spiritofcat
origami_8 wrote:Very nice model.
The half circle with a,a,b,b in the top middle is a bit misleading, it would be more obvious what to do if you just delete it. Looking only at the small version it could be mistaken to be angle quarters.
Thanks for the feedback. I was troubled because I couldn't find a way of drawing the crease lines at the exact angle they're meant to be, so I wanted to include that extra information to clarify.
Of course, the best solution would be for me to diagram the folding process for those creases, but it seems like a lot of work.
I'll see if anyone else has anything to say about it and then maybe make some revisions.
legionzilla wrote:The dimetrodon looks clean and simple. Why don't you fold a wetfolded one like adams chen.
PS: adams chen, that is a cool model, one of my faves
I don't really know much about wetfolding, I've never tried it. Does it require special paper?
Which model by adams chen do you mean?
Posted: April 29th, 2009, 9:36 am
by spiritofcat
Yesterday I bought Jeremy Shafer's book Origami to Astonish and Amuse.
Here are the models that I've folded from it today:
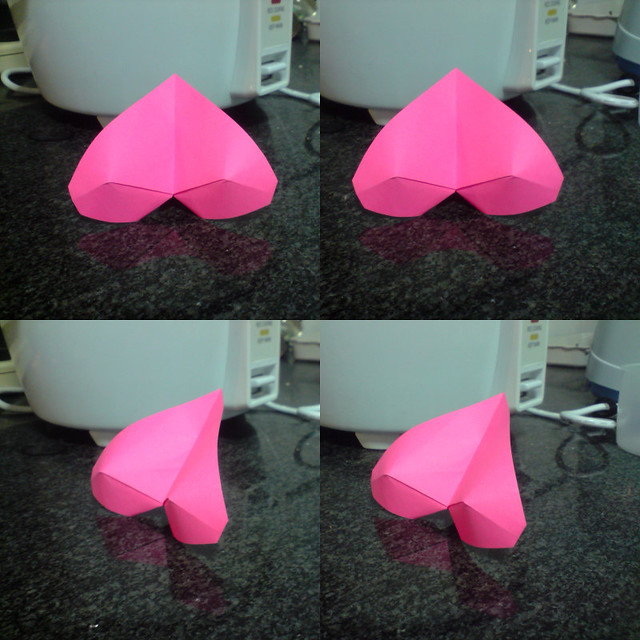
The so-called Upside Down Heart.
I suspect that it may be a model of something else entirely though, not a heart at all, though still in the same general region, anatomically speaking...
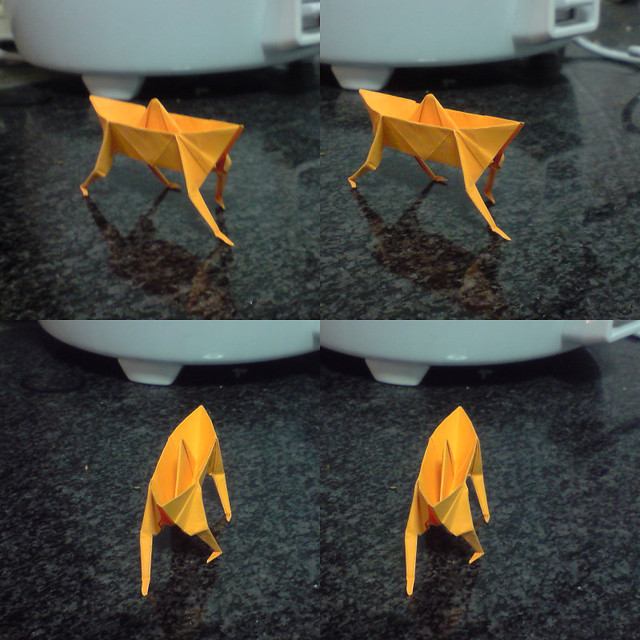
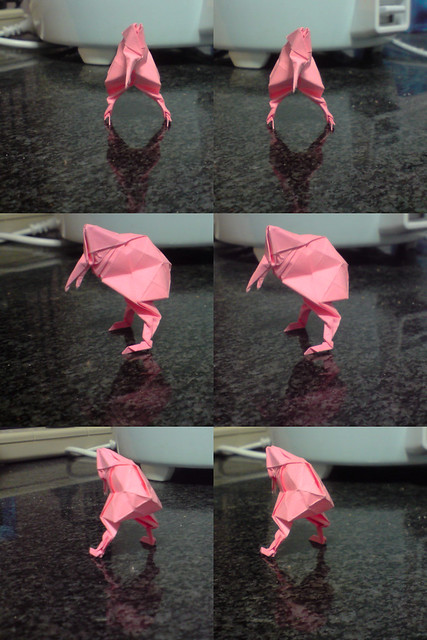
The Walking Boat.
It's a charming little model, and it has such character. I really like it.
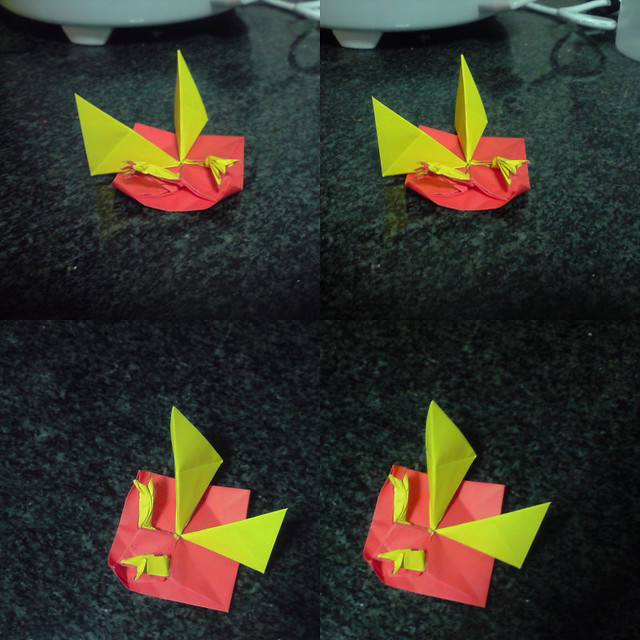
This is my half-completed attempt at the model called Folding the Blintz Base.
Jeremy recommends using at least 10 by 10 inch foil to fold it, but I was only using 15 by 15cm paper. At this size it gets a bit fiddly, and the layers get a bit too thick to make it really look good, so I decided not to complete the other two hands.
I also tried folding his Crab, but like the Folding the Blintz Base, it seems that my paper was just too small and thick for it.
I was using my 10cm paper, and it just became far too thick and fiddly.
Posted: May 2nd, 2009, 7:01 am
by spiritofcat
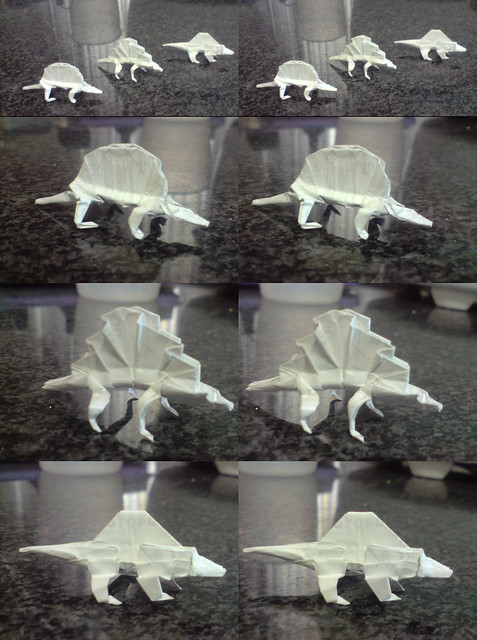
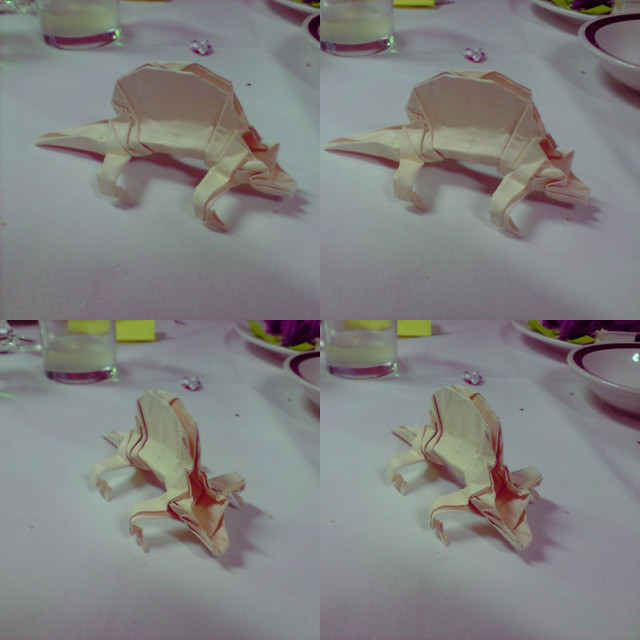
Here are some more Dimetrodons that I folded at work today.
All three are folded from 8cm thermal receipt paper.
The first and third are from squares, the second is from a rectangle of 8cm by a bit more than 8cm.
The first one is almost exactly the same as my previous one, same base, just improved shaping.
The second one is the same again, but with the CP stretched to fit a rectangle.
With the extra length I made some extra pleats in the fin.
I folded the edges of the pleats out to give the impression of the bones of the fin, but it ended up making it look more like a Stegosaurus.
The third one was a completely different design. I wanted to try to make the fin from a single middle flap rather than two parallel flaps.
Didn't turn out as well as I would have liked though.
Here's a pic of what a dimetrodon is supposed to have looked like:

Which of my three models do you think is best?
Posted: May 2nd, 2009, 7:23 am
by legionzilla
The second one looks the best, though tad sloppy. Why don't you add toes?
Posted: May 2nd, 2009, 4:04 pm
by Ondrej.Cibulka
Toes are redundant detail which detract from essential of the model. In this case, the essence of the model is a big plate on the back of reptile. And I like more the second one.
Anyway, I think, that toes are not present due to just sketch of the design. I suppose that spiritofcat will add toes after chosing of the type of the design.
Posted: May 3rd, 2009, 4:23 am
by spiritofcat
Yeah, no toes right now for two reasons.
First, as Ondrej said, they are more of a luxury than an essential, and second, the paper I folded these from is only 8cm by 8cm so the feet are only a few mm long. Not really enough space for that kind of detail.
Posted: May 8th, 2009, 1:22 pm
by spiritofcat
A couple of things to show off today.
First, another Dimetrodon. I folded this one at my cousin's Engagement party.
It's folded from significantly larger paper than my others, but thicker too.
The paper I used was an unfolded envelope from a card.
It was probably about 18cm,and quite thick, so it was a little bit of a challenge to work with, but I was fairly pleased with the result.
Everyone else was very impressed of course.
I really need to find a way of making the head a bit more of a solid shape. It looks okay from the side, but from the front it's very open.
At the same party I also folded another small Dimetrodon from 10cm paper, and I was quite pleased with it too, but didn't bother to take any photos of it.
At work the other day, I made some of JB. Vincent's Crane Modules.
I made 6 of them, forming a four pointed polyhedron.
It's quite a novel module, but not as stable as I would like.

Now however, the star attraction of today's update...
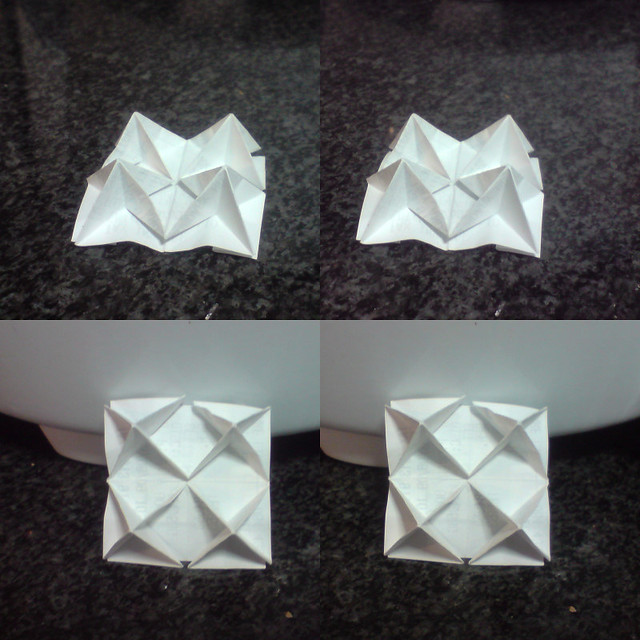
My Stellated Octahedron!
This is the same polyhedron you can make from 12 sonobe modules, but I've folded it from just one square. I feel pretty proud of myself for this achievement.
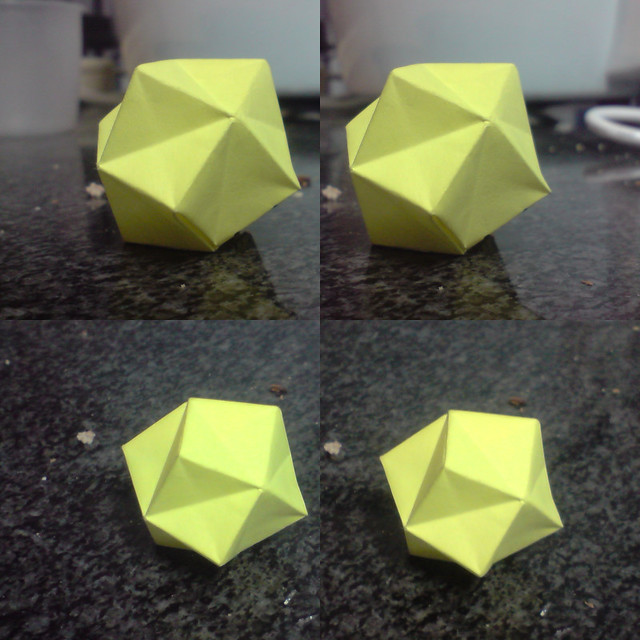
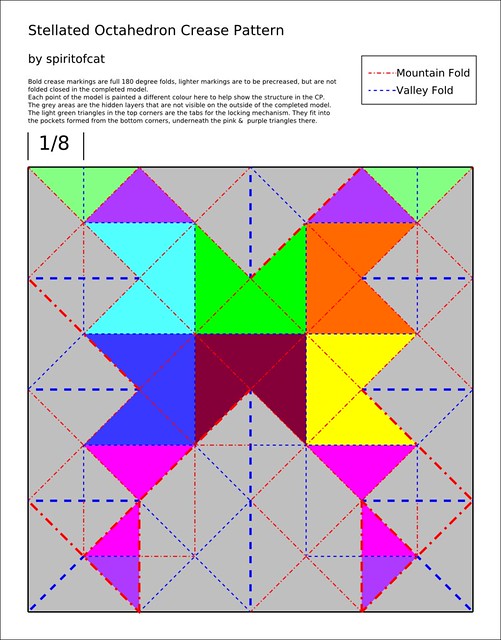
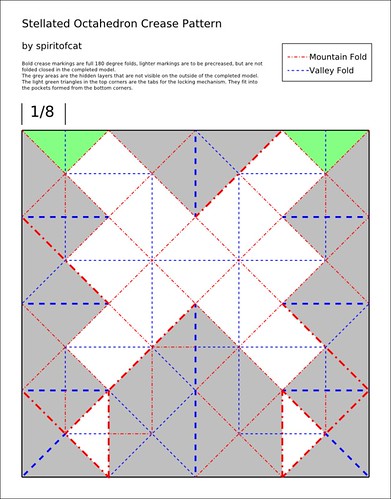
I've drawn the CP for it too.
Here are two versions. One with each point a different colour, and one just plain white.
Posted: May 9th, 2009, 11:49 am
by Razzmatazz
Those are pretty amazing. Which ones are about high intermediate level, because I'd like to try some!

Posted: May 9th, 2009, 4:34 pm
by spiritofcat
Razzmatazz wrote:Those are pretty amazing. Which ones are about high intermediate level, because I'd like to try some!
Thanks for taking an interest.
I'm not really too familiar with the levels of difficulty that are assigned to origami.
Of the models that I folded from Shafer's book, the heart and boat were rated as Low Intermediate and the Blintz Base folding itself was rated as Complex.
I'd say my Dimetrodon is reasonably simple, as long as you can understand my CP/Diagram.
The Stellated Octahedron is a little harder than the Dimetrodon but it should be quite manageable if you don't get overwhelmed looking at the CP. The folding sequence is fairly straight forward.
It's just a matter of precreasing the diagonal grid in full, and then putting in the hard creases as shown by the bold markings on the CP.
If you print out the colourful version and fold that the first time it should make it pretty easy to understand.
Posted: May 10th, 2009, 2:05 am
by Finward
Plain white... Aren't we daltonic supposed to see less colours?

That star looks very nice, I would like to fold it, to see how it works. Of course, if I can only find some time in my schedule

Posted: May 15th, 2009, 1:35 pm
by spiritofcat
Here is my latest effort.
About 3-4 hours work in Inkscape.
This is my first full diagram done in Inkscape, so I'd love to hear your feedback and suggestions on how I could improve.
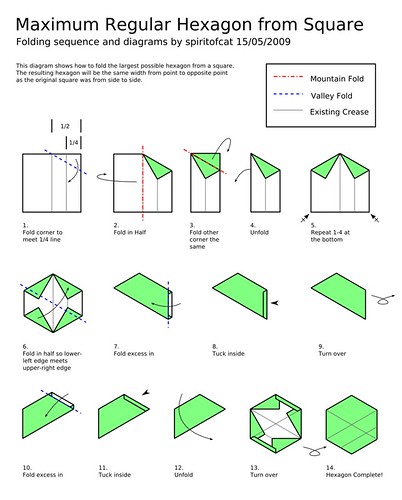
Edit: After thinking about it a bit more, I've discovered that this actually isn't the very largest hexagon that can be made from a square.
I've worked out how to make a larger one by starting the creases at the middle of the hexagon and aligning them with the diagonal of the square.
The difference in size is only very minor though, and the version diagrammed here is significantly easier to fold accurately.
Posted: May 15th, 2009, 6:16 pm
by origamimasterjared
Nice diagram, but that's not the largest, or even easiest, hexagon from a square. I prefer the one where two opposite points lie on the diagonal, because it's much easier to cut/tear off the extra surrounding paper. It's a bunch of triangles instead of having those skinny rectangular things.
Posted: May 16th, 2009, 12:04 am
by spiritofcat
Thanks for having a look.
Yeah, you'll notice that I edited my post to state that I'd realised that this isn't the largest, and that the larger one is made in the way you have said.
I had a little more difficulty folding that one though.
Anyway, I'll practice it today and maybe diagram it this evening.
Posted: May 16th, 2009, 8:24 am
by spiritofcat
I've got better at folding that diagonal hexagon today, but I still find the folding sequence a pain. I end up with more construction related creases dirtying the surface of the hexagon too.
I think I'll stick with just making them from rectangles. I'm pretty sure I have the most efficient method for that, and it doesn't have any messy construction creases in the end. I'll diagram that next.
Meanwhile, I designed and folded a Kiwi this afternoon.
It starts from a waterbomb base. I did it this way because I wanted to make it inflatable like a waterbomb.
This folding of it is a bit scrappy because I was experimenting a lot while folding it. I'll probably fold a neater version tomorrow.
Posted: June 5th, 2009, 9:46 am
by spiritofcat
Hmm, never got around to folding a neater Kiwi. Still, maybe I will someday.
Today I designed and folded another 3D sort of tessellation.
I really like trying to fold 3D stuff that sticks out of the paper.
Here is the 4 unit version I folded at work.
Folded from an 8cm square of thermal receipt paper:
And here is the 16 unit version that I folded this afternoon after work.
Folded from a 10cm square of paper:
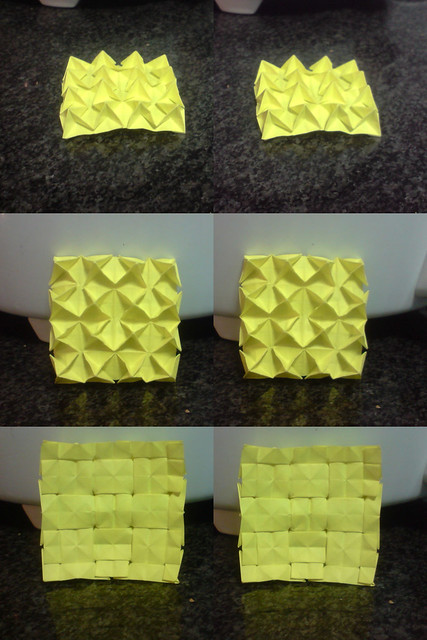
That 16 unit one was quite a challenge to produce. It's hard to keep the spikes you've made in shape while folding the next ones.
I guess if I'd precreased it all exactly with the correctly placed mountain and valley folds it might have been able to just collapse into place, but I was working from just a basic set of square and diagonal grids.
I drew the CP for a single unit on some paper at work, so I can pretty easily draw up the CP for these version in inkscape when I get around to it.