the flaps should be flat, I think.
I haven't folded it in a while...
Satoshi Kamiya - Bahamut/Divine Dragon
Forum rules
READ: The Origami Forum Rules & Regulations
READ: The Origami Forum Rules & Regulations
-
lancealmekian
- Newbie
- Posts: 15
- Joined: September 11th, 2008, 4:44 am
I need help with the legs. The way the Divine Dragon's legs were folded in the diagrams if followed faithfully just leaves a lot to be desired (i.e. the legs look too flat/skinny for a dragon's). I took the liberty of capturing these images from a video over at youtube:
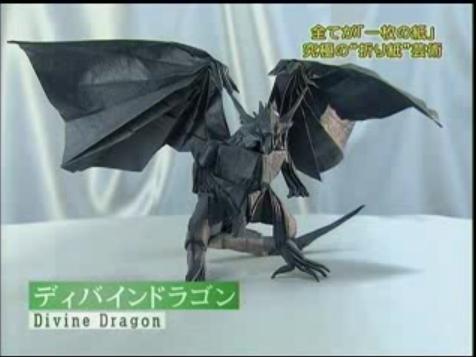
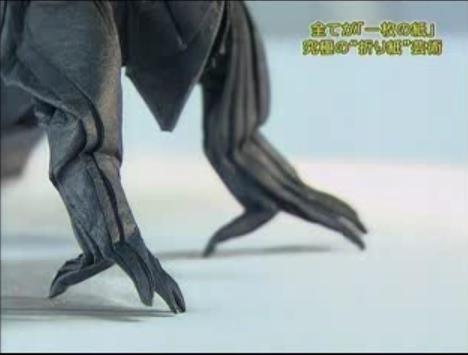
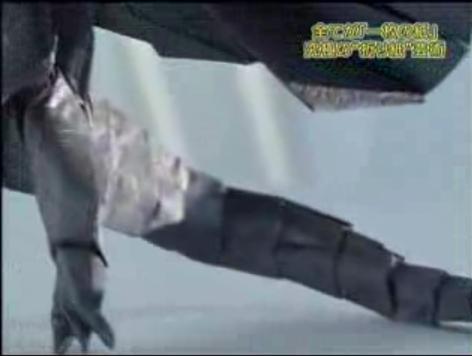
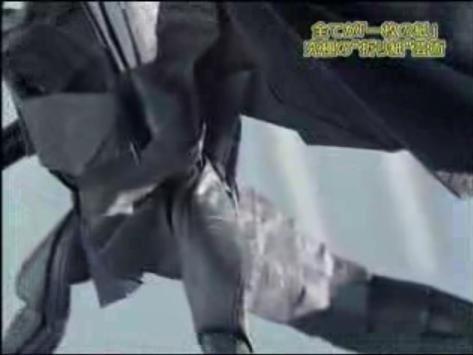
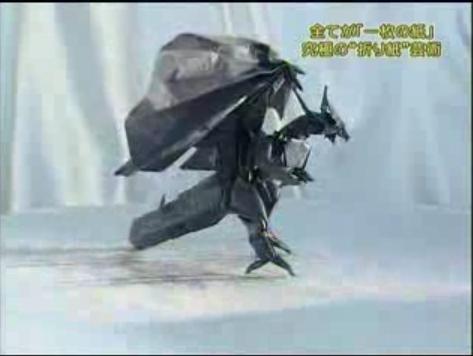


I know it's possible to make these legs from the Diagrams for Bahamut 2.0 (I don't think the process of coming up with these requires those for Bahamut 2.1) so I'd like to ask for input from people of these boards. I desperately wanna be able to fold this model in a better way. Honestly I think 2.1's legs are a tad shorter compared to the normal 2.0's (which I think is very promising, the video proves that point). If I could fold this it would mean a lot. I appreciate your inputs/criticisms/violent reactions. Thanks in advance.
EDIT: I think I might have just found out how. Inputs are stil welcome though. ^__^
Need help with head and body...
Can someone please explain the head and body parts to me? I cant get them shaped right... I have the rest done just not the front...
James Justus Jr.
-
lancealmekian
- Newbie
- Posts: 15
- Joined: September 11th, 2008, 4:44 am
-
wantotlearn
- Newbie
- Posts: 5
- Joined: March 31st, 2009, 3:15 am
-
Ragnorax

- Senior Member
- Posts: 474
- Joined: February 17th, 2009, 12:51 am
- Location: Florida, USA
- Contact:
i assume u mean the steps from "Works of Satoshi Kamiya".wantotlearn wrote:i need help in step 23-53 please help i got stuck, i thank you a lot if help me
well starting from 23, you squash and pleat the creases that were folded in step 21 just like the diagrams show, and lay the front and back flaps in different directions. After that, steps 29-31 is just folding the corners to the center. steps 32-39 is open sinking each of the flaps that were made in steps 24-27. your result after these steps should look like step 40. when u get to step 42, u just open up the pleats at the bottom of the paper, and repeat steps 24-37 on those creases. the steps after this are pretty easy folds. step 47 might be a little tricky but look at how it should be folded by usuing step 48 as a reference. hope i helped
the diagrams directions are pretty clear. just make sure you follow them carefully.
-
wantotlearn
- Newbie
- Posts: 5
- Joined: March 31st, 2009, 3:15 am
-
Ragnorax
- Senior Member
- Posts: 474
- Joined: February 17th, 2009, 12:51 am
- Location: Florida, USA
- Contact:
@ wantolearn, the diagrams in the book clearly show how it should look after the steps. taking pictures wouldnt look much different than what is shown in the book.wantotlearn wrote:i have got the CP but can you send me images of how it will look, i cant see how to make the step...
heres a picture of my bahamut from 24" square of wrapping paper
[img]http://img11.imageshack.us/img11/7503/bahamut4l.jpg[/img]
-
wantotlearn
- Newbie
- Posts: 5
- Joined: March 31st, 2009, 3:15 am
-
wantotlearn
- Newbie
- Posts: 5
- Joined: March 31st, 2009, 3:15 am
-
Ragnorax
- Senior Member
- Posts: 474
- Joined: February 17th, 2009, 12:51 am
- Location: Florida, USA
- Contact:
@wantotlearn That step 47 is a little tricky but ill try to explain the best i can. The way i did it was: pinch the 2 triangle flaps making a mountain fold on each triangle (just like the diagram). Begin to pull them back, and while doing that, reverse the central point and mountain fold the diagonal down. Then fold the 2 triangle flaps back over so it looks like step 48.
(sorry if that doesnt make much sense)
@SYY99 for step 51, fold up the pleats making valley creases where indicated. it should line up with the triangle on the left side, and the top of the paper.
hope i helped
(sorry if that doesnt make much sense)
@SYY99 for step 51, fold up the pleats making valley creases where indicated. it should line up with the triangle on the left side, and the top of the paper.
hope i helped
-
Ragnorax
- Senior Member
- Posts: 474
- Joined: February 17th, 2009, 12:51 am
- Location: Florida, USA
- Contact:
Re: Step 70
for step 70, try opening up the layers on top and pushing back the corner that is indicated so that it lines up with the top corner of the model. In doing so, the bottom point of the paper will be pulled up and then just fold it flat along the bottom so that it makes the mountain-valley-mountain-valley-mountain pattern shown in step 71.SYY99 wrote:thx for step 51 but now i stuck at step 70 :/
hope that helps because that is the best i could explain it in words
~Nate
My flickr gallery: http://www.flickr.com/photos/imperfect-origami/
My flickr gallery: http://www.flickr.com/photos/imperfect-origami/
-
lancealmekian
- Newbie
- Posts: 15
- Joined: September 11th, 2008, 4:44 am


![[img]http://img11.imageshack.us/img11/7503/bahamut4l.jpg[/img]](http://img11.imageshack.us/my.php?image=bahamut4l.jpg)