(as published in "Origami Sourcebook", Jay Ansill)
So I understand how to fold this except for one or two steps. Unfortunately, one of those steps is right at the beginning. Can someone explain what's happening in step 8?
The directions just say "open out and push up paper from the inside", which seems horribly ambiguous. And also, I can't tell if the fold drawn is along an existing crease or is a new fold (in which case reference points are nowhere to be found).
Thanks
Help with Shiva (Robert Lang)
Forum rules
READ: The Origami Forum Rules & Regulations
READ: The Origami Forum Rules & Regulations
-
Lux Aeterna
- Newbie
- Posts: 40
- Joined: June 19th, 2006, 7:23 am
- Contact:

-
Brimstone

- Buddha
- Posts: 1729
- Joined: November 23rd, 2004, 3:59 am
- Location: Colombia, South America
- Contact:
Shiva has the same base as the Praying mantis. You can find the diagrams for the mantis at http://dev.origami.com/images_pdf/mantis.pdf the instructions are a little clearer there. Basically what you have to do is to unfold and refold to obtain something similar as one of the flaps of a bird base. Similar not exactly the same
-
Joseph Wu
- Senior Member
- Posts: 443
- Joined: April 18th, 2005, 7:27 pm
- Location: Vancouver, BC, Canada
- Contact:
Don't feel bad about asking about this model. The diagrams in Ansill's book are pretty badly done. (But don't blame Jay...the publisher hired the diagrammer, and didn't hire a proof-reader.)
Yes, I am that Joseph Wu. Not that it really matters. And please call me Joseph or Joe. "Mr. Wu" is my dad. 
-
Daydreamer

- Moderator
- Posts: 1423
- Joined: October 28th, 2005, 2:53 pm
- Location: Vienna, Austria
- Contact:
Here some pictures that will hopefully help for this step.
First you have to open out the layers of the open sink from the previous step a bit to get something like in the next picture.
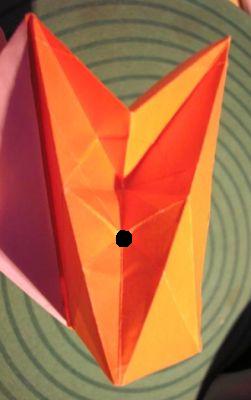
Then push up the noted point from underneath.
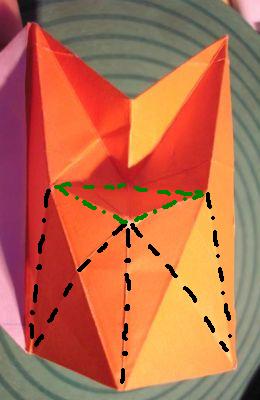
Now you have to collapse the structure along the creases shown.
Black creases are existing ones from precreasing, green ones are new.
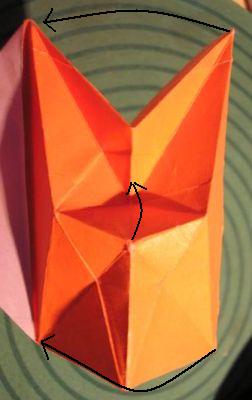
Close the layers up.

In progress...
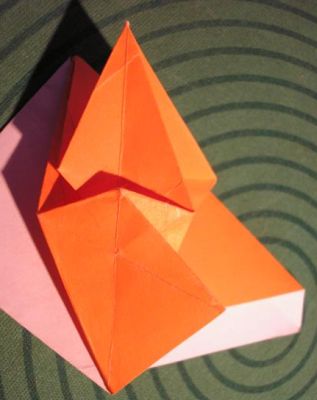
Finished.
Hope that helped a bit
First you have to open out the layers of the open sink from the previous step a bit to get something like in the next picture.
Then push up the noted point from underneath.
Now you have to collapse the structure along the creases shown.
Black creases are existing ones from precreasing, green ones are new.
Close the layers up.
In progress...
Finished.
Hope that helped a bit
So long and keep folding ^_^
Gerwin
Gerwin

-
Brimstone
- Buddha
- Posts: 1729
- Joined: November 23rd, 2004, 3:59 am
- Location: Colombia, South America
- Contact:
Step 19 is a maneuver made in many models. I made a video a while ago (don't remember what model it was for), that shows how to do it:
<embed src="http://www.youtube.com/v/8DrHFj4cbKc&hl=en_US&fs=1&" type="application/x-shockwave-flash" allowscriptaccess="always" allowfullscreen="true" width="480" height="385"></embed>
<embed src="http://www.youtube.com/v/8DrHFj4cbKc&hl=en_US&fs=1&" type="application/x-shockwave-flash" allowscriptaccess="always" allowfullscreen="true" width="480" height="385"></embed>