Hand made paper, tools & techniques

General discussion area for learning about paper, and the different types available.
Post Reply
mummykicks
Junior Member
Posts: 118
Joined: September 25th, 2010, 9:30 pm
Location: Tucson AZ

Hand made paper, tools & techniques

Post by mummykicks »

This is going to be a lengthy post, but hopefully someone will find it useful.
So I decided to start making my own paper, and found there was precious few resources on the net for actually making thin large sheets. While Lafosse's book is a good starting point, I found it, and other resources, both in print and on the web to be lacking in terms of my own needs. The main problem I had with most of it is that without a hollander beater you end up having to buy 1lb of beaten pulp (at $70/lb), which makes 50+ 20" square sheets at or near the thickness of double tissue MC. That coupled with the fact that you really couldn't dry it out and use it whenever (it needs to be beaten again), and storing for long periods wasn't considered a good idea lead me to look around for alternatives since I have no need for making 50 sheets at a time.
I really wanted to be able to make large sheets ~36" square without having to stitch smaller sheets together. There is nothing wrong with stitching, but I figured if I was going to do this it might as well enable me to make one large sheet, and the fact that abaca blends are considered the best paper (origamido) for origami I would be getting premium paper to boot.
To get started you need:
A workspace that can get wet.
A water source.
A vat of some kind.
A pulp beater of some kind.
A press of some kind.
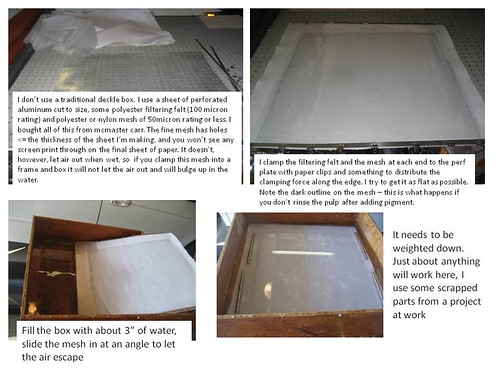
A screen or mesh and a deckle/mould or deckle box.

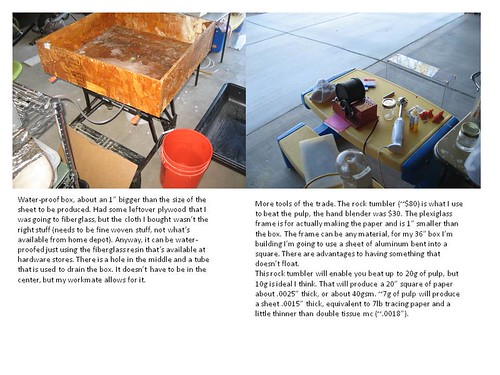
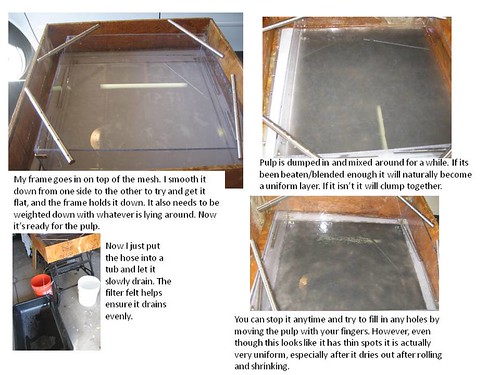
The two most difficult things are the beater and the press - especially if you are going to press sheets larger than about 15" square. The reason is pressure. The larger the area, the higher the force required to get the same pressure, the higher the force, the stronger the frame required for the press. The bigger the frame the larger and heavier and more expensive it gets. I was going to make a vacuum press, but that gets big and it is good to leave it under vacuum for a while. Most commercial vacuum generators that are cheap enough are not really designed for extended running, and there is the noise to consider.

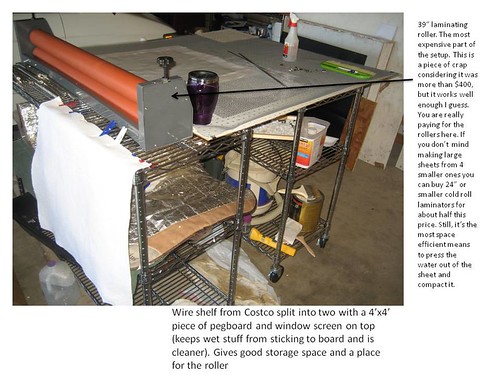
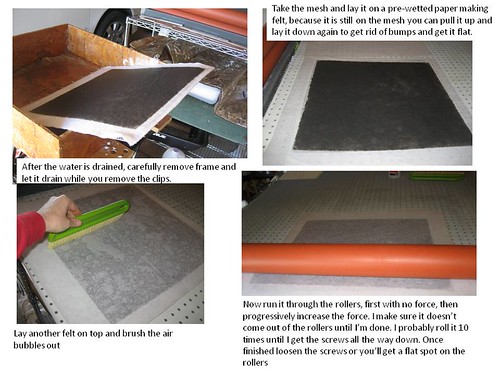
After some searching a cold press roller (used for laminating) was what I bought. The line contact of the cylinders provides very high pressures (because the actual area is quite small). It is also the most space efficient alternative. It does a great job getting the water out and compressing the sheet.

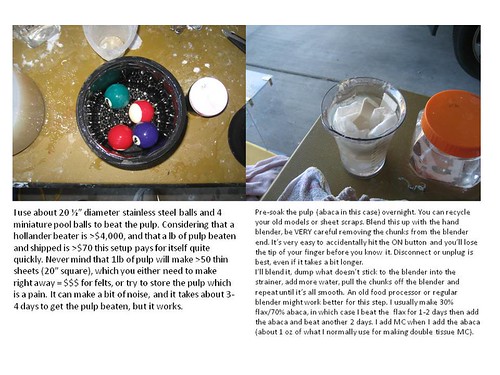
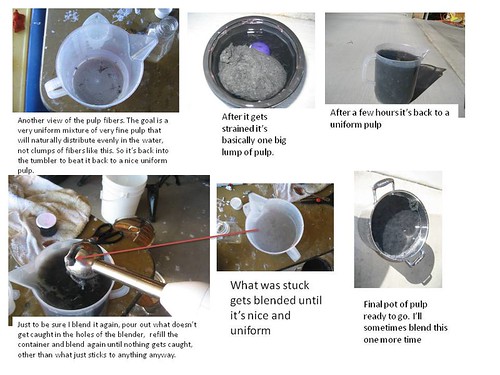
The beater I use is actually a rock tumbler with ball bearings and some miniature pool balls. I just add pulp and water and let it tumble for a few days. The tumbler is designed to run continuously. It takes 2-4 days depending upon what fibers I'm using. I've been using a 30% flax, 70% abaca blend. I beat the flax for 2 days then add the abaca and sizing and let it run another 2 days. It's slow, but it works just fine.

Lastly, rather than try to pull sheets, and figure out how to get the thickness I want, I saw a video on U-tube with a couple of women using a box within a box that gave me an idea. What if you just put in the desired amount of pulp (dry weight) and then just drain the water out?. If the pulp mixture is uniform you should get uniform sheets. This is completely opposite from the standard methods for making paper where they slosh it around to get a uniform distribution. The advantage is that it requires no skill :D, and you get very precise control on sheet thickness. It doesn't require a box with a latching screen/frame either.

If this is something you want to do, be prepared to spend $500+ to get set up.
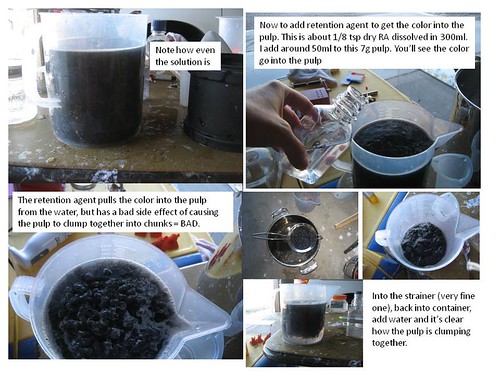
The pulp, pigments, retention agent, and felts will cost about $120 (I got mine at twinrocker).
The shelves ~$100.
The cold laminating roller >$400 for a 39" version, cheaper for smaller ones.
The mesh, filter felts, perf sheet in my setup $150.
Then the miscellaneous wood and stuff ends up costing $100 by the time your done.

Once setup, however, you can get pulp for around $10/lb, or less than 50 cents a sheet for 20" squares. I'm guessing it will be about 20 years before I break even, but it's still WAY cheaper than golf or just about any other hobble you care to get involved with.

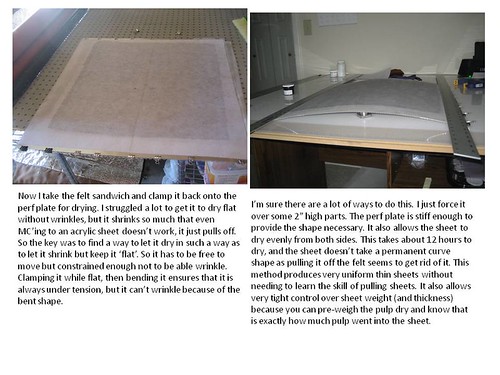
The next post has the details of the process that I've settled on, and I've gotten good results using it.
mummykicks
Junior Member
Posts: 118
Joined: September 25th, 2010, 9:30 pm
Location: Tucson AZ

Re: Hand made paper, tools & techniques

Post by mummykicks »

These pics are of my setup and process
Image
Paper making tools 1 by mummykicks, on Flickr

My crappily built vat:
Image
Paper making tools 2 by mummykicks, on Flickr

Image
Paper making 1 by mummykicks, on Flickr
mummykicks
Junior Member
Posts: 118
Joined: September 25th, 2010, 9:30 pm
Location: Tucson AZ

Re: Hand made paper, tools & techniques

Post by mummykicks »

Here's the process, final sheet is .0015" thick, or the same as 7lb tracing paper:
Image
Paper making 2 by mummykicks, on Flickr

Image
Paper making 3 by mummykicks, on Flickr

Image
Paper making 4 by mummykicks, on Flickr

Image
Paper making 5 by mummykicks, on Flickr

Image
Paper making 6 by mummykicks, on Flickr

Image
Paper making 7 by mummykicks, on Flickr

Image
Paper making 8 by mummykicks, on Flickr
User avatar
OrigamiGeek
Forum Sensei
Posts: 966
Joined: February 17th, 2012, 2:29 pm
Location: calgary

Re: Hand made paper, tools & techniques

Post by OrigamiGeek »

cool I haven't made any. but I rely want to
Check out my gallery and don't forget to leave a comment!
User avatar
gachepapier
Forum Sensei
Posts: 533
Joined: June 17th, 2008, 11:22 am
Contact:

Re: Hand made paper, tools & techniques

Post by gachepapier »

This post series is great, thanks for taking the time to explain all this in detail !
mes p'tits plis (now also in English)
User avatar
OrigamiGeek
Forum Sensei
Posts: 966
Joined: February 17th, 2012, 2:29 pm
Location: calgary

Re: Hand made paper, tools & techniques

Post by OrigamiGeek »

yes thanks so much
Check out my gallery and don't forget to leave a comment!
mummykicks
Junior Member
Posts: 118
Joined: September 25th, 2010, 9:30 pm
Location: Tucson AZ

Re: Hand made paper, tools & techniques

Post by mummykicks »

Glad it's proving useful. The only thing I've really changed is that I bought a larger rock tumbler (12lb capacity) and it works much better. Rather than have to keep MC and retention agent solutions available I changed/refined the process a bit:

Pre-soak the fibers/pulp sheets for at least an hour, preferably overnight.
Blend it up and add it to the rock tumbler.
Add water almost to the top (I leave about .5" space).
Add dry MC powder and dry retention agent. I do about 1/4 tsp of each for a 15g batch of pulp. My sheets are right around 18" square, which this size batch gives me two sheets a little thinner than double tissue MC, or 7g/18" square ~ 25 gsm.
I run it for 2 days like this using a full set of minature pool balls and 20 of the 1/2" dia ball bearings.
Then I add pigment.
Run for another day, then rinse the pulp by straining it, add more water to it, strain it again, then back into the tumbler for another day.
If the pulp doesn't look like it has enough color I'll put more retention agent in and more pigment and run it another overnight, rinse, run for a day and it's ready.
I have also found that going really slowly with the rolling is important, too fast and the water will mess up the sheet as it gets squeezed out. I do 3 rolls, first with no pressure, then about half, then at max.

I have found the best combination of properties comes from MC'ing a sheet of handmade to tissue, either one or two sheets.
I mc the tissue separately, then use a spray bottle to wet the handmade onto a damp felt flat, put the tissue on and get it all wet, add another damp felt, and then roll it together. It comes out very flat and most of the wrinkles from the tissue are removed.

The only problem is getting it to stay flat when drying after doing this. It will pull off any surface you try to mc it to, so it needs to be weighted down and held in place or it will wrinkle. Once I get it nailed down better I'll post some more pics.
Post Reply