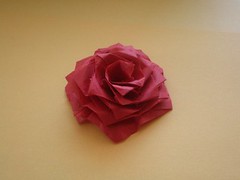
Robert J. Lang - A Miura-ken Beauty Rose
Forum rules
READ: The Origami Forum Rules & Regulations
READ: The Origami Forum Rules & Regulations
-
¤ » SU§HI « ¤
- Newbie
- Posts: 3
- Joined: January 20th, 2007, 7:16 pm
- Location: California
- Contact:

-
letranthedung
- Junior Member
- Posts: 77
- Joined: November 18th, 2005, 9:42 pm
-
¤ » SU§HI « ¤
- Newbie
- Posts: 3
- Joined: January 20th, 2007, 7:16 pm
- Location: California
- Contact:
kenongab: the rose is on page 230-234 and i think it is actually bad as you say it, but as long as you dont sell scans i dont think anyone would mind.
letranthedung: my grandma lives in japan and i have recently asked her to look out for some complex books. i also purchased the convention book and enjoy folding the origami!
letranthedung: my grandma lives in japan and i have recently asked her to look out for some complex books. i also purchased the convention book and enjoy folding the origami!
-
TheRealChris
- Moderator
- Posts: 1874
- Joined: May 17th, 2003, 1:01 pm
- Location: Germany
Hey guys, sorry for bumbing up a old thread, but I really need help with this flower. Been working on and off on this for the last few weeks, and I just cant seem to twist it like Daydreamer describes. Is there any chance someone can make a small video of how to twist it properly after collasping.
Thanks you in advance.
Thanks you in advance.
-
perrosaurio

- Super Member
- Posts: 177
- Joined: February 11th, 2007, 11:28 pm
- Location: Chile
- Contact:
Sorry Keljaden, I'm just in the first steps yet...
this thread is an incredible history! I really enjoyed reading it entirely, remarkable when Daydreamer used ReferenceFinder (a year ago!!) to get point Q and also explanation from Silent Winter about how to get all the horizontal creases. Maybe there is already a diagram from Lang for this rose, but I decided to grab my old calculator and do some Maths:
First, Silent Winter's Maths are perfect.
Second, the points used by Daydreamer were (0.364, 0.364) and (0.3632, 0.3632), but the real point (as I show in the image below) is (0.363636, 0.3625) but I think we can forgive him

As Silent Winter's calculations are exact, line H is critical, also because point Q belongs to it and we can crease all vertical lines from it. In the image we assume that square edge lenght is 1, so height h of line H (0.3625) divided by 1 should give us the Tangent of the angle alpha in the opposite corner, if we apply ArcTg function to it the result is amazing
19.9256 degrees
which is, talking in degrees, 20!
Is there any easy way to get a 20 degrees fold from the edge? No idea. I've got one doing the 30-deg trick and then the tri-secting angle trick but it's complicated.
Anyway, using a 20 deg fold to get line H and folding the 45 deg diagonal between that line and the horizontal bottom line to make the blue square on the image, you can get point Q in (0.36397, 0.36397) without using ReferenceFinder (but using a calculator )
)
I'll try the rose and see if I'm enough dog to this bone.
grettings.
this thread is an incredible history! I really enjoyed reading it entirely, remarkable when Daydreamer used ReferenceFinder (a year ago!!) to get point Q and also explanation from Silent Winter about how to get all the horizontal creases. Maybe there is already a diagram from Lang for this rose, but I decided to grab my old calculator and do some Maths:
First, Silent Winter's Maths are perfect.
Second, the points used by Daydreamer were (0.364, 0.364) and (0.3632, 0.3632), but the real point (as I show in the image below) is (0.363636, 0.3625) but I think we can forgive him
As Silent Winter's calculations are exact, line H is critical, also because point Q belongs to it and we can crease all vertical lines from it. In the image we assume that square edge lenght is 1, so height h of line H (0.3625) divided by 1 should give us the Tangent of the angle alpha in the opposite corner, if we apply ArcTg function to it the result is amazing
19.9256 degrees
which is, talking in degrees, 20!
Is there any easy way to get a 20 degrees fold from the edge? No idea. I've got one doing the 30-deg trick and then the tri-secting angle trick but it's complicated.
Anyway, using a 20 deg fold to get line H and folding the 45 deg diagonal between that line and the horizontal bottom line to make the blue square on the image, you can get point Q in (0.36397, 0.36397) without using ReferenceFinder (but using a calculator
I'll try the rose and see if I'm enough dog to this bone.
grettings.
-
humblestumble
- Newbie
- Posts: 7
- Joined: December 9th, 2006, 9:16 am
I started the crease pattern today after reading this inspiring post! But, I am no where near finished with collapsing. I have never worked from a crease pattern before, but I decided to learn and I usually catch on quickly. I just have no idea how to start. What I've been trying to do is bring in the left side together into...something of a donut? But when I do that, I just get accordion action in a donut shape and only the edge has the little folds that are supposed to be there.
I have read everything here, but I am still confused as to what to do next. Please help if you can
I have read everything here, but I am still confused as to what to do next. Please help if you can

So you've got accordion right? You see the vertical zig-zags in the CP? These are six multiple reverse folds you need to do next. Each one is one of the angles in "donnut". Just be careful with the last two reverses so the "donnut" doesn't collapses into a ring, but into some kind of spiral.
This was my first cp as well, so I understand your frustration. I hope this helps...
This was my first cp as well, so I understand your frustration. I hope this helps...
-
humblestumble
- Newbie
- Posts: 7
- Joined: December 9th, 2006, 9:16 am
I am still confused, but thanks for taking the time to help. I found my camera and am going to clarify my situation via flickr.com

I have been obsessed over trying to figure this out. I stayed up really late last night trying all sorts of different things. Is it so easy that I can't see it?
And being that I am so new to this, are there extra creases to be made after the base is formed? I have been sticking strictly to what is given on the CP.
Did I fold it the opposite way? I was studying some other pictures that you all have uploaded, and it seems to me that I may have not folded it on the right side? Or am I mistaken?
When I figure this thing out, I am definitely making and hosting a video for collapsing for those of us who are having a difficult time.
-
Joe the white

- Senior Member
- Posts: 456
- Joined: May 17th, 2003, 2:51 pm
-
humblestumble
- Newbie
- Posts: 7
- Joined: December 9th, 2006, 9:16 am
Hmm, like this? This is a view from the 'top' of the paper where the smaller triangle sections are.
EDIT:
Is it supposed to look like this?:
http://www.langorigami.com/science/4osm ... 0Miura.pdf
If so, I have no idea how to get it into a flat, pentagon spiral.
EDIT:
Is it supposed to look like this?:
http://www.langorigami.com/science/4osm ... 0Miura.pdf
If so, I have no idea how to get it into a flat, pentagon spiral.
i think this is how you do it, maybe someone can confirm, sorry for the bad quality i only had my mobile phone by me. http://www.databas.be/video05190001.mp4
Just in case you still need help:
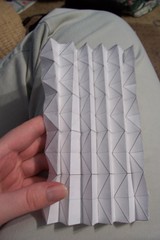
First of all, the accordion should be pleated along vertical lines, not horizontal, as you started, and those black vertical lines aren't really creases (although I accidentally pleated them, as you can see).


Then you make reverse folds along first zig-zag

then second zig-zag (this one in multiple reverse fold)

and when collapsed it looks like this:

And so on

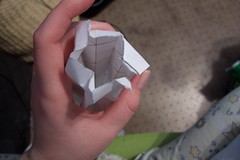
and so on, and after you've done all reverses the base looks like this:

And THEN the real pain begins, because it takes a lot of time and nerves to transform this chaos into something remotely beautiful...
I hope this will be more helpful...
First of all, the accordion should be pleated along vertical lines, not horizontal, as you started, and those black vertical lines aren't really creases (although I accidentally pleated them, as you can see).
Then you make reverse folds along first zig-zag
then second zig-zag (this one in multiple reverse fold)
and when collapsed it looks like this:
And so on
and so on, and after you've done all reverses the base looks like this:
And THEN the real pain begins, because it takes a lot of time and nerves to transform this chaos into something remotely beautiful...
I hope this will be more helpful...