Page 3 of 9
Posted: February 15th, 2008, 11:27 pm
by elsix2004
iot wasn't easy up to now. you have to do some folds on this model that you woldn't belive...i don't think there is a name for them. but i did them, because the diagram had logic. i understand every step until 106 and every step after. but i can't understand step 106, i don't see what clusters i should pull....
maybe it's experience as you say....i don't know
Posted: February 15th, 2008, 11:30 pm
by klnothincomin
Well, maybe you are just too stressed. Just put it aside for now and do something else, maybe you can't think well if you are frustrated.

Posted: February 15th, 2008, 11:42 pm
by elsix2004
lool...that's why i do origami in the first place...to calm down

)
Posted: February 15th, 2008, 11:48 pm
by klnothincomin
But don't get all giddy on a single step, or else you will not calm down. Just keep folding the best you can, and do the best you can!
Posted: February 16th, 2008, 12:01 am
by elsix2004
thanks for the advice. i'll try
Posted: February 16th, 2008, 12:07 am
by klnothincomin
Your welcome! I always like to help!
Posted: March 12th, 2008, 9:49 pm
by elsix2004
sorry to bother you again but i want to ask you another question...
i got pass 106, but i have some troble at 166, i don't realy understand how that sink goes...it's not as easy as just flatening until you get the picture in 167 is it...?
ca you please make some photos of steps 166-173 please if it's not to much troble...
i mean 166,167 and 168 are separate steps right? not just diferent helps to sink the paper...
Posted: March 15th, 2008, 1:17 am
by JeossMayhem
Like other people here I've got finals coming up... but here's some sloppy pics (my dorm has terrible lighting so the flash doesn't help, have to settle for blurry pics...)
166-168 show the same maneuver. 166 and 168 show all of the creses in the move, but 167 shows the ones you should make first.
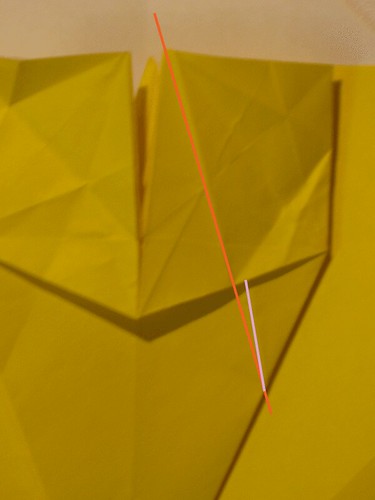
Here is the result of 165. The red line is the fold that goes through the layers. The pink line there is a fold that is made in 167.
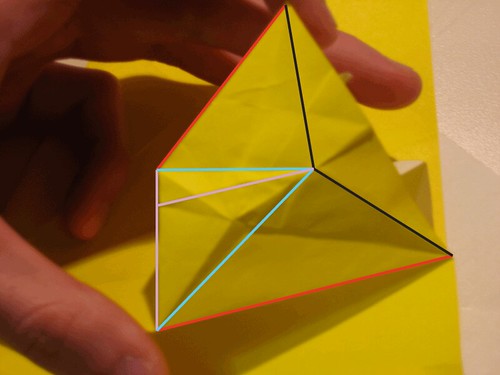
Here is 168 from a different view. The red creases are mountain folds that were made in 165 and the black lines are guide folds made in 164 just emphasized for clarity, don't fold these again.
Fold the vertical pink line first, a mountain fold (this one was drawn in the previous pic. It doesn't align with the layer behind it. Then fold the two teal lines, representing valley folds. The diagonal pink fold should fold itself as you collapse the whole thing.
Here is a shot in the middle of the collapsing process, with reds as mountain folds, teal as valley folds:
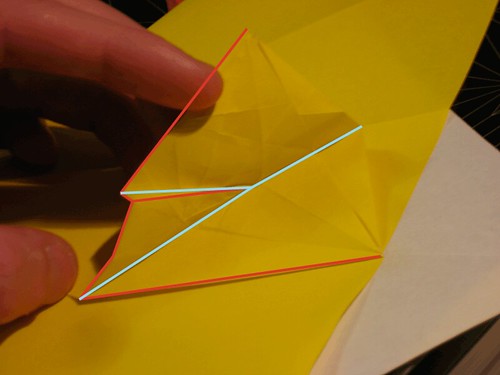
The whole thing should basically fold itself after you get the creases shown in step 167 done (meaning that you don't have to precrease everything first). First, make the crease on the lowest layer (made in 165) and keep it there. Then, fold the next mountain fold (the vertical pink one), and pull it upwards as far as it'll go, and then flatten the whole thing from the bottom up. This should create the rest of the creases.
The open sink in 169 should be doable from here on. The creases for it align with the middle-line of the model, visible on adjacent layers. Check back after you've tried this. Good luck. I have to spend the rest of my friday night with biology now.
Posted: March 15th, 2008, 2:57 am
by rdrutel
Nice job
Posted: April 28th, 2008, 5:37 pm
by Vykintas73
Two questions:
1) doesn't the model lie flat in steps 207-211?
2) from where to where goes the crease-line in step 209 and on what layer(s)?
thanx.
Help
Posted: May 17th, 2008, 10:30 am
by Barbarlan
When i do the open sink at Step53, the pleat didnt go down. Further on, i got no idea wat is Step 56 saying... i dun noe to open wat and squash wat.

Posted: May 17th, 2008, 1:16 pm
by Vykintas73
It hasn't to go down in step 53. Step 53 is just an open sink. Pleats go down when you do folds in step 54.
Step 56 just follow the show crease lines - there's nothing serious about this step.
Bahamut
Posted: May 17th, 2008, 1:18 pm
by Barbarlan
hmmm... Vykintas, maybe u r right, maybe it is because i'm using a newspaper for this bahamut thats why i got problems folding using the creases. i would try it over again using a coloured paper.
bahamut problem step 203
Posted: December 6th, 2008, 1:55 pm
by barakboom
im have a problems doing the wings at steps 203 and so on.
can anyone post a guid how do to this steps?
Re: bahamut problem step 203
Posted: December 20th, 2008, 10:14 pm
by insaneorigami
The model itself isn't that hard, you just have to remember that the claws on the wings are folded in somewhat the same manner as the legs. As long as you get to the part where you start to fold the claws, then you're doing pretty well, just don't forget that they are only slightly different fromt the legs, just slightly. Hope this helps