Page 3 of 4
Kamiya's Lyrebird
Posted: October 5th, 2009, 1:06 am
by andssl
The diagrams are in the new number of Origami Tanteidan Magazine (nº 117) :D
Posted: October 11th, 2009, 6:17 pm
by pharmjod
Hello everyone! This is my first time asking for specific help in a model, so please bear with me.
I have been working on this model now for a couple of days. I get to step 58 just fine but I'm not fully sure I understand what is going on in step 59 and 60. I skipped ahead just to see how the model finished up and it appeared to me that this step was important in completing steps 88 - 92 as well.
Finally, I am a little confused as to how the tail is finished. I get what is being done up to 107, but I'm somewhat confused how to proceed to form the pleats / tessellation for the tail.
Any suggestions or guidance on this would be appreciated. Thanks!
Jody
Posted: October 11th, 2009, 8:43 pm
by Daydreamer
I'm just in the progress of folding this model.
Here is how I think steps 59-60 (which is actually only one step) have to be done.
You have to separate the top layers from other layers and push them upwards.
I will try to help with step 107 as soon as I get there.
Edit: You are right, this step is necessary to be able to form the wings in steps 88-92.
Posted: October 11th, 2009, 9:29 pm
by pharmjod
Thank you Gerwin. That does look like what the intended step should be, but I'll have to try folding it again with different paper soon. I used some 13" Kami paper and it gets too thick for me around all of those open sinks there. I like this model so far, and apart from all the open sinks, it has a relatively enjoyable folding sequence for me as well (so far at least since I haven't really attempted the tessellation on the tail yet).
Jody
Posted: October 12th, 2009, 11:18 pm
by Daydreamer
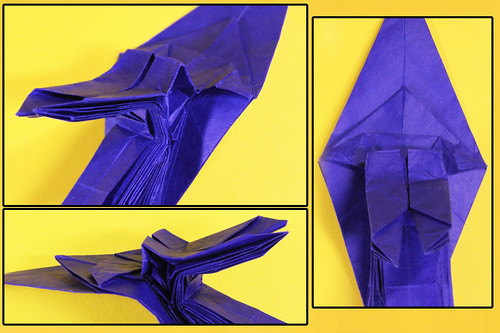
Ok, I've finished the model.
Here a short explanation for making the tail corrugation.
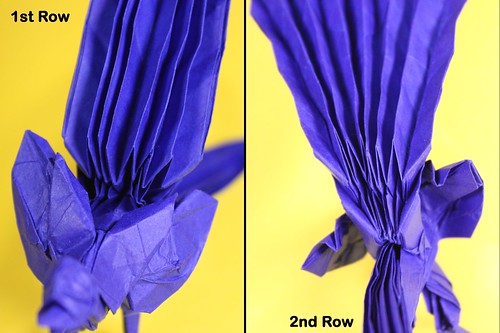
The tail of the lyrebird is basically constructed out of loads of reverse folds. The diagrams tell you to make one reverse fold using all layers, and then open out the layers one by one and collapse again to form a series of reverse folds. You continue doing those series of reverse folds until you reach the end of the tail. It is not important to do it the way as shown in the diagrams as long as you end up with a series of reverse folds in each row.
And here's my finished lyrebird.

Posted: October 13th, 2009, 4:08 am
by Kijjakarn
Nice Lyrebird, Daydreamer. I think I'm gonna buy the magazine soon.
PS. 2 years on the forum!
Posted: October 13th, 2009, 4:22 am
by pharmjod
Thank you sir. We'll see if that is enough to pull me through it. I'll try to post something if I get the model finished. I'll have to try with different paper though. What did you use btw?
Jody
Posted: October 13th, 2009, 1:14 pm
by Daydreamer
I've used double-tissue paper because this model definitely needs thin paper with all the layers coming together. In retrospect some kind of foil paper might have been better for doing the shaping of the tail feathers in the end.
Posted: October 13th, 2009, 5:58 pm
by insaneorigami
The tail feathers at the end definitely look a bit funky, but apart from that, very cleanly folded, and nicely done!
Posted: October 21st, 2009, 9:35 am
by eric_son
Wooohoohooo!!!
Finally, my Tanteidan issue has arrived!
Lyrebird time!
Posted: October 23rd, 2009, 7:25 am
by WhisperPuffin
Anyone got paper suggestions for this?
Re: Satoshi Kamiya - Lyrebird
Posted: October 2nd, 2011, 8:41 pm
by satoshifan
try it from 30 cm. parchment paper. its not a good color, but it's very thin and holds creases very well, which will be useful in the 24 open sinks.
Satoshifan
Re: Satoshi Kamiya - Lyrebird
Posted: March 2nd, 2013, 12:54 am
by bethnor
Hello! I'm trying to fold the lyrebird from "works of satoshi kamiya 2" and got stuck on steps 45-48. If anyone can help me forward it would be much appreciated.
dunno any easy way of putting this.
45 should fall on preexisting creases. 46-8 involves opening out the flap. if all else fails with any collapse, make sure your mountains are mountains and your valleys are valleys.
after this is where it gets hard hard, lol.
Re: Satoshi Kamiya - Lyrebird
Posted: May 17th, 2013, 8:24 pm
by decafmartin
Hello!
Though I'm making some progress and learning to fold better, I'm yet again stuck on the lyrebird. I've taken a sequence of pictures to demonstrate my current difficulties, if anyone has had a similar experience and can explain a solution (or what I've done wrong) I'd be in gratitude.
Step 79:

I fold this part up, creating the valley fold described...

But these layers that I previously sunk in step 52 follow the flap...

Making the final result look nothing like the crease pattern in step 80 (cant flatten the layers without destroying my previous sink):

Any suggestions are appreciated!
Re: Satoshi Kamiya - Lyrebird
Posted: May 21st, 2013, 3:08 am
by bethnor
keep the flap on the left together. you seem to be pulling them apart. spread squash where you have the arrow. don't worry if it's not neat.