Page 1 of 3
Shuki Kato - Spinosaurus
Posted: November 26th, 2009, 8:00 pm
by orislater
hi i don't know what to do on steps 32-33
Posted: November 26th, 2009, 8:13 pm
by origami_8
Follow the arrows exactly and don't forget to rotate the model 180°.
Posted: November 27th, 2009, 4:32 am
by orislater
ok ill try it again. and thank you for the quick reply anna
Posted: November 30th, 2009, 10:24 pm
by bethnor
i'm not exactly clear on what you're supposed to do on steps 52-53. do you just sink that part of the pleat? there seems to be valley/mountain fold lines that are flush with the top fo the body that i can't make out, and simply sinking the pleat doesn't give me the appearance of the underside that you see in step 55.
Posted: March 10th, 2010, 4:43 am
by bethnor
bump. i notice some people have folded his successfully. i'm still having trouble making out what exactly you're supposed to do at 52-53. i notice you have to do it again later, sort of.
Posted: March 10th, 2010, 12:41 pm
by aces21
If you look at the position of the mountain folds in step 53 you can see this is giving the new outline to the sail, so anything outside of this needs to be pushed inside. From memory I creased this first and started sinking, then the other ceases from step 52 sort of fell into place (with a little persuasion!)
Of course thats just my interpretaion of the diagram, it might not be as Shuki intended.
Posted: March 12th, 2010, 7:21 pm
by bethnor
thanks, aces21. i figured it out ~ 2 hrs after i made my post (after coming back to the model ~ 4 months later!). i think kato intended steps 52-53 to be a continuation of the previous steps of pulling out the pleats to form the sail.
Re: Shuki Kato - Spinosaurus
Posted: August 17th, 2011, 11:35 pm
by Carsen
I'm having trouble on step 28. I think it is because I messed up on step 27 with the open sink. Can someone elaborate on that open sink?
Re: Shuki Kato - Spinosaurus
Posted: August 21st, 2011, 9:46 pm
by oz
Welcome to the forum!
The sink is open, which means you have to unfold the flap behind and sink it too. These pictures should help you out a little bit with the sink:
From there, you need to make the two vertical creases and petal fold. Once the petal fold (step 28) is finished, the layers on the side will look like this:
Hope this helps! Have fun!
Re: Shuki Kato - Spinosaurus
Posted: August 23rd, 2011, 11:29 pm
by Carsen
Thank you Oz, it did help. Though I'm still having troubles on other steps, and I also find it hard to read the diagram because it is so blurry.
Re: Shuki Kato - Spinosaurus
Posted: August 28th, 2011, 3:19 am
by leosign40
Hello,
I am also having difficulty completing this model.
Currently I am stuck at step 56. Can't quite make out what the step is doing, mainly because the diagram is quite blurry. Looking ahead to step 57 does not help any.
Hope someone can help.
Thanks.
Re: Shuki Kato - Spinosaurus
Posted: September 7th, 2011, 6:04 pm
by origami-artist-galen
Hey,
If you're still working on the model I can take some photodiagrams of that step for you; if you can wait till this Thursday or Friday.
-Shuki
Re: Shuki Kato - Spinosaurus
Posted: September 8th, 2011, 5:50 am
by leosign40
Yes, that'll be great. I'll be waiting for the photos then. Thanks.
Re: Shuki Kato - Spinosaurus
Posted: September 10th, 2011, 6:32 pm
by origami-artist-galen
I'll start folding and picture taking now then. You see, I wasn't sure if you were still folding and I was kind of busy doing other things:)
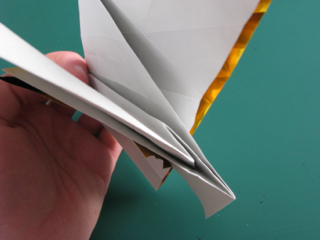
Re: Shuki Kato - Spinosaurus
Posted: September 10th, 2011, 9:13 pm
by origami-artist-galen
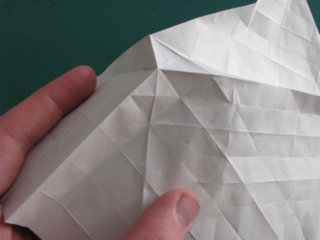
Okay.

This is what the figure should look like after step 55.

Start to pull on the corner creating a pyramid like shape.

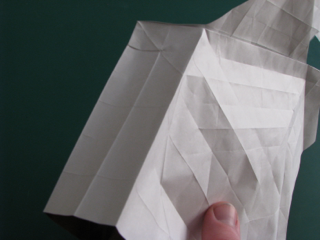
Like this. You are using the precrease in step 54.

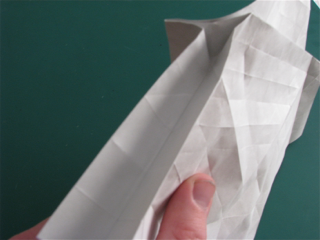
Repeat below and begin to flatten.

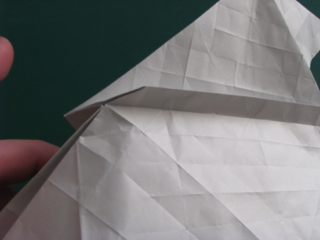
Done.