Help please - I am stuck on step 29-32 of the beetle. I have the Japanese version and I can't read Japanese (although I can read Chinese).
The kanji seems to say something about the top point and inside and outside but I don't seem to be able to work it out.
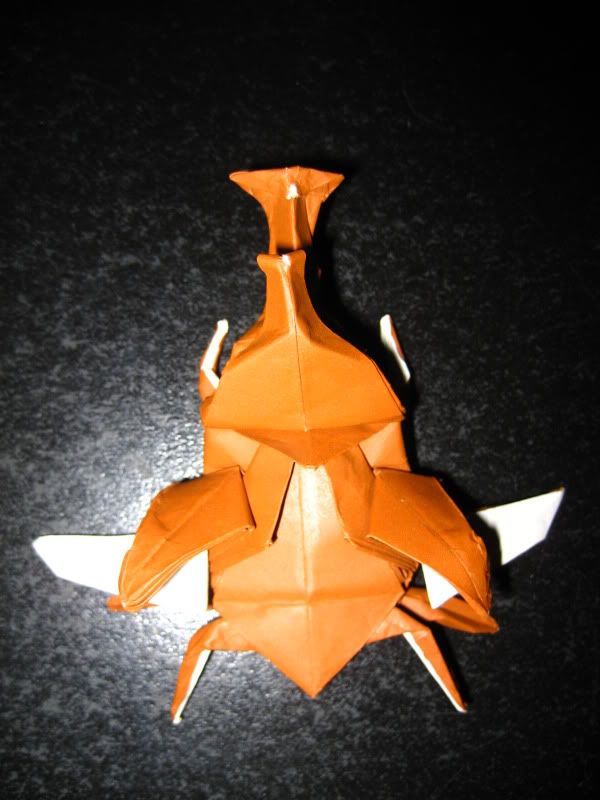
Jun Maekawa Genuine Origami Flying Samurai Helmet Beetle
Forum rules
READ: The Origami Forum Rules & Regulations
READ: The Origami Forum Rules & Regulations
Samurai Helmet Beetle
I have the english version and it says "push and reverse the inner corner"
Hi,
I am also trying to fold this model. I got stuck at steps 42-43.
In the picture from the diagram from the step 43, there seems to be some extra paper in the right side of the flap. Paper that should be pushed in.
In the picture of my model that part doesn't appear.
If anybody could give some tips, i would really appreciate it.
Thanks
Step 42

Step 42 to 43

Step 43

I am also trying to fold this model. I got stuck at steps 42-43.
In the picture from the diagram from the step 43, there seems to be some extra paper in the right side of the flap. Paper that should be pushed in.
In the picture of my model that part doesn't appear.
If anybody could give some tips, i would really appreciate it.
Thanks
Step 42
Step 42 to 43
Step 43
Hi
I got stuck there too until a bit of poking around.
When you open up the flap in step 42, the top flap doesn't quite sit flat (or line up perfectly) on top of the bottom (2) wing flaps. What you need to do in step 43 is to spread squash the top flap down a bit from above and that will push some of the paper further out to form the mountain folds (hence the solid arrow for squash fold - except you don't really push from the right but the top)
After that you should get to step 44.
Good luck with it - the result is worth the trouble.
-
pohchunyee
- Newbie
- Posts: 22
- Joined: May 1st, 2010, 8:22 pm
- Location: Buffalo, NY
-
InsomniacFolder

- Senior Member
- Posts: 291
- Joined: January 12th, 2006, 3:26 pm
- Location: Maidenhead, UK
-
InsomniacFolder
- Senior Member
- Posts: 291
- Joined: January 12th, 2006, 3:26 pm
- Location: Maidenhead, UK
OK, have the book today.
Treat steps 111-112 slightly different to the diagram.
Step 111:
Part 1:
Make the indicated fold through all of the layers in the flap.
Note the reference point for the fold at the bottom.
Don't worry about squashing it yet.
The top point of the flap indicated in step 111, and the portion of the edge from it to the pre-crease line indicated in the picture for step 111, should be horizontal as indicated by the final position in step 112
When the point and edge are horizontal as indicated, pre-crease & unfold through all of the layers.
Part 2:
Now we will do step 111 as diagrammed, it will be made easier by the presence of the precrease.
Put your finger on to the spine of the flap you have just pre-creased, as if you were going to squash it.
Separate the layers in the spine with your finger.
2 layers go with the bottom section, one goes up top.
Slowly refold the flap along the pre-crease.
Ease the top layer up gently as you go.
As you reach the natural limit of the papers ability to stretch, flatten out the shape with the top layer horizontal as indicated in Step 112.
It should fall quite naturally in to place.
The entire section now lies flat in the indicated position of step 112
I hope that is at least some help
I like this model - hopefully you can post a picture of the finished version when you get there.
"Had we but world enough and time..."
-
guillotineboy103
- Newbie
- Posts: 1
- Joined: November 15th, 2010, 6:46 pm
Help please, I'm stuck on step 33. The left leg of the model I made is not in front of the flap behind it as shown in the step. This way I cannot fold it upward. I'm trying my best to describe what my model looks like right now, please reply if anybody knows what I'm talking about. Basically at this point my model looks and are exactly the same from the front and behind. And what does it mean on step 32, to fold 8 layers of paper or 8 layers of flaps and do I still flip it around to do steps 25-31? Please help!
Re: Jun Maekawa Genuine Origami Flying Samurai Helmet Beetle
Steps 29~31 are very tricky, can somebody explain please?
Thanks already.
Thanks already.
Re: Jun Maekawa Genuine Origami Flying Samurai Helmet Beetle
For anyone stuck on this so many years later:
The flap in question has 2 layers (the one we will be manipulating is the back layer, where the paper doesn't split)
on 29, the back layer needs to be reversed (keeping the front layer as is), almost like reversing a sink fold.
30 is basically saying to fold the back layer in half, and flattening the model.
31 is to fold the flattened flap in half.
Another way to think about this is that you reverse the back of the flap in 29, and the shape created in 31 is like a side view of the result of 29.