Page 2 of 3
Posted: September 1st, 2007, 12:40 am
by tchaiky
hello,
i have some trouble with this model. i'm actually stuck on step 11

.. the tips of my paper don't meet. i tried folding it a few times, even measuring the lines with a ruler, but still they don't meet. i'm not sure what i'm doing wrong.. am i just not accurate enough?
any help would be appreciated, thanks.
Posted: May 25th, 2008, 1:00 am
by Fc1032
Sorry everyone, I have the same problem (step 11) with my model too. The flaps don't meet together. Are we supposed to actually make a 45 degree waterbomb collapse or do we follow the crease made according to the diagrams? I can't make the ends meet with the diagram creases
Thanks in advanced (tchaiky and I both need this explanation)
Its okay now, I found out it was a normal 45 degree waterbomb, i just finished step 18 thanks to the previous advice thanks alot!!
Posted: December 4th, 2008, 11:54 am
by jojotoar
Can someone help me in step 36-37 ??
Posted: December 4th, 2008, 7:30 pm
by mrsriggins
Make sure you make your beginning creases as accurate as possible and where they are supposed to be. I didn't look closely at the diagrams the first time I made the model and didn't align my creases right which messed the model up later. I'll look at the diagrams tonight when I get home and try to help more with 11 and 36-37.
Posted: December 5th, 2008, 9:00 am
by jojotoar
Thank you so much mrsriggins !

Posted: December 6th, 2008, 7:12 am
by mrsriggins
I just finished the photo steps for tchaiky and jojotoar. I will upload the pictures tomorrow afternoon so be sure to check back!
Posted: December 7th, 2008, 7:29 am
by mrsriggins
Okie Dokely let's do this.
Step 10. Pinch the three lines into mountain folds.
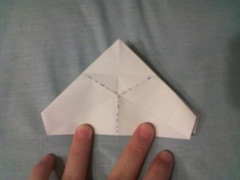
10a. As you pinch the middle fold push upward and the triangle at the top will naturally form a valley fold along its base and fold up.
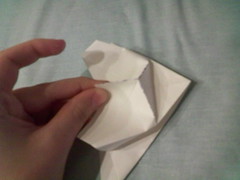

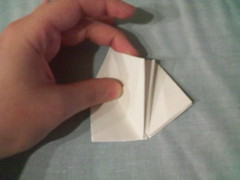
10b. Press lightly on the sides after the triangle is folded up and the niddle part you were pinching should now be its own flap so fold that over to the right. Repeat on the back
Step 10 completed
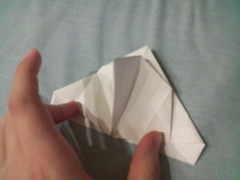
Fold the left flap over to the right.

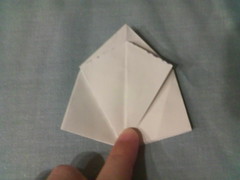
Make a valley fold on the bottom corner of the flap that you just folded over so that is matches the flap that lies beneath it.

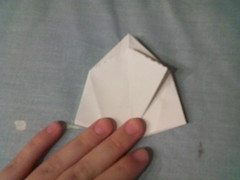
The two flaps
Fold the flap back to the left and change the valley crease you made into two mountain creases, one for each side of the flap, and sink that area into the model.
Now if you lift up the middle flap you can see the area that you sunk into the model and there a little bit hanging over the middle. Fold that over so you can see the middle of the middle flap clealy. This will make folding easier ad that little bit will block you from moving the flaps around.
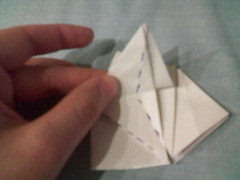
Completed. Now repeat this sink process on the remaining three flaps.
Posted: December 7th, 2008, 8:02 am
by mrsriggins
And jojotoar... this is a little bit harder to photograph because the model is 3d at this point and I had to hold the model with one hand and try to take clear straight shots with the other so hopefully you can make sense of this....
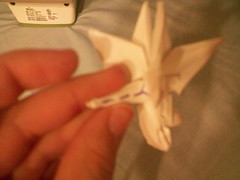
So at step 36 we have 6 flaps (not including the curved flaps on the bottom), five of them are folded to the front as petals and one is left sticking out the back as the stem. Well the stem bit has two flaps hanging down and step 36 is simply tucking the extra bits up into the stem. So take the blue denoted area and fold up into the red denoted area. (sorry bout the red line in the picture, flickr hates me and made it too big after I saved the changes.)
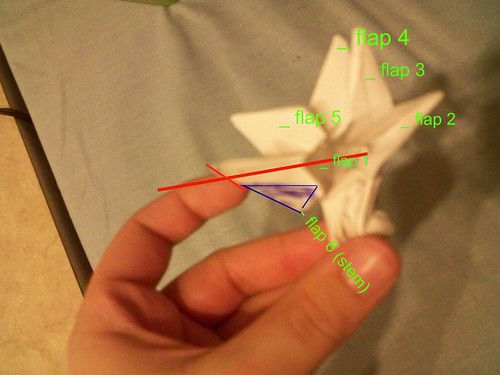
Step 37 is narrowing the stem even further by pinching it in half (mountain fold) . The fold branches out towards the top of the stem where it meets the model.
In the process of pinching...

top view after the pinch, mine is still kind of fat but you should have a flat and narrow 'stem' flap here.
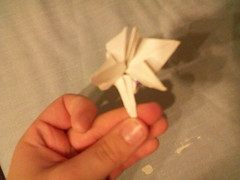
The other part of step 37 which I forgot to take a picture of is to fold the two small cup flaps on the bottom rounded part to the sides.
Here's my smushed and lopsided orchid. I highly recommend wet folding for the final petal placement and securing them with MC. My only disappointment with this model is that I have not received a pleasing outcome unless wet folding the details with MC.

still stuck
Posted: October 30th, 2009, 6:12 am
by Roddypiper
Hi guys gosh I was having so much trouble with this one. I'm still stuck on part 24 though, for the life of me can't figure out exactly what the fold is. Any help would be greatly appreciated! Thanks!
orchid robert lang
Posted: November 30th, 2009, 5:52 pm
by maniok
can someone make a video how to fold this orchid and place it to Youtube?
Posted: December 18th, 2009, 12:52 pm
by missaimeeee
could anyone tell me what the book is called that has the instructions to make this model in it.
Posted: December 18th, 2009, 2:31 pm
by Ben385
It's in Origami Design Secrets by Robert Lang
Posted: December 19th, 2009, 11:16 am
by missaimeeee
thankyou kindly!
Posted: May 6th, 2010, 10:23 pm
by jesse2884
i've been stuggling with this orchid for weeks

can someone please make a tutorial and put it on you tube? b/c i suck at reading these diagrams haha
Posted: January 6th, 2011, 10:45 pm
by the modern einstein
Roddypiper,
in step 24 you can just treat this fold as a regular reverse fold, ignoring the triangular creases in the middle of the outside edge, and just press down on the inside until the model lies flat. admittedly, it will be a bit scrunched up inside, but this makes no difference to the finished model.
Jesse2884,
if you just tell us what you are having issues with we might be able to solve your problems on this forum without reverting to youtube. please refer to my comments below if you are not able to read these diagrams, which are some of the best i have ever encountered in an origami book. Maybe reviewing chapter 2 on the diagram symbols and actions might help you?


For all of the people who are asking questions about this model, don't you reckon you have set your sights too high in buying this book if you cannot fold the orchid

, with models that are in the most part, somewhat more complex than the orchid diagrammed throughout the book. in other words, try a book that you can actually fold the models in for a change.


