Page 1 of 1
Shuki Kato - Wolf
Posted: December 9th, 2015, 2:40 am
by abnyc
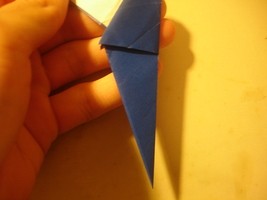
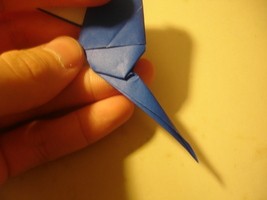
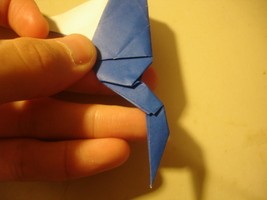
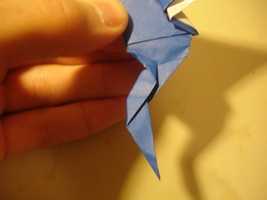
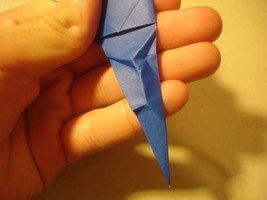
I'm a bit puzzled by the rabbit ear/pleat in step 74. Can anyone break it down for me? Or maybe take a process shot or two?

Should end up looking like:

Thanks!
Re: Shuki Kato - Wolf
Posted: December 9th, 2015, 9:49 am
by roodborst
Just by looking at it I would rabbit ear the leg first then do an inside (or outside) reverse fold.
Re: Shuki Kato - Wolf
Posted: December 9th, 2015, 7:28 pm
by origami-artist-galen
Re: Shuki Kato - Wolf
Posted: December 11th, 2015, 6:17 am
by abnyc
Thanks, Shuki! Looking forward to taking another crack at it this weekend.
Re: Shuki Kato - Wolf
Posted: January 30th, 2016, 11:00 am
by Forum_Lurker
I don't suppose anyone can take photos of steps 81 & 82? I'm having trouble working out which flap I should unsink and how I put everything back together...
Re: Shuki Kato - Wolf
Posted: June 21st, 2019, 12:39 pm
by DragonSmith
Good day,
I'm folding the wolf for the first time, and I'm not sure what to do in steps 23 and 25, which both read 'bring one layer in front (closed-sink).' I have three layers, the middle one has two little flaps. I can easily close-sink the outer layers, but then what does 'bring layer in front' mean?
Would appreciate your help! Here's a photo:
https://imagizer.imageshack.com/img921/2589/ceD1aR.jpg (excuse the mess! it's a test fold)
Re: Shuki Kato - Wolf
Posted: June 21st, 2019, 4:37 pm
by Baltorigamist
"Bring a layer in front" generally means that there's an edge hidden behind one or more layers or flaps. From my experience, it's usually a valley beforehand; you're supposed to sink that flap/layer inside (or wrap the edge around). The valley will be converted to a mountain fold, and the nearest layer (currently) will be hidden behind the new edge.
My guess is that in this case, all you have to do is sink the nearest flap (the blunt triangle) inside the rest of the model. (I don't have the diagrams.) This will bring the layer under the flap to the front.
It's difficult to explain in words. I would show you if I had any scrap paper lying around.
Re: Shuki Kato - Wolf
Posted: June 21st, 2019, 11:17 pm
by DragonSmith
Thank you! I’ll try that.
Re: Shuki Kato - Wolf
Posted: June 22nd, 2019, 4:45 am
by Folderp
Balto is correct. You have to closed sink the two blunt triangles that are above and below the two small flaps. Closed sinks can be a little tricky, but it shouldn't be too hard with points that obtuse. You basically just push them inside out.
Re: Shuki Kato - Wolf
Posted: June 22nd, 2019, 6:35 pm
by DragonSmith
Thank you very much! Very helpful.
Re: Shuki Kato - Wolf
Posted: March 27th, 2021, 1:04 am
by BorisG
Hello!
I'm stuck at step 64, which says 'swivel behind'. If I understand correctly, I first push the little corner triangle inside, and then fold the lower half of the foot upwards, bringing it behind? If I do this, once I turn the model over at step 67, I can see an extra crease between the front legs and the body which isn't shown anywhere on the diagrams afterwards. I can make it look like the diagrams by simply folding the lower half of the leg behind in step 64, but then why are the white arrow and little dotted crease shown in step 64? Or I can first swivel the leg behind and then lock the small flaps between the other layers, but that seems not to be what the instructions call for at all.
Would really appreciate some help! Can post some photos if needed.
(I'm folding the standalone diagram of the wolf, not the more complex one that comes in 'Nature Study')
