 [/img]
Help with origami spring?
Forum rules
READ: The Origami Forum Rules & Regulations
READ: The Origami Forum Rules & Regulations
Help with origami spring?
Sorry if this is in the wrong section...but im having trouble with the oragami spring. I got all the precreasing done, but i cant figure out how to roll it into a spring. I watched a few videos, but i still cant get it. HELP!!
[/img]
[/img]hi
-
Brimstone

- Buddha
- Posts: 1729
- Joined: November 23rd, 2004, 3:59 am
- Location: Colombia, South America
- Contact:
Spring into action is not an easy model, the collapsing gives trouble to most folders who try it.
The best videos I've seen for it are:
http://www.youtube.com/watch?v=10zyL1YY2rk and http://www.youtube.com/watch?v=r3C5nHdP3ps
The best videos I've seen for it are:
http://www.youtube.com/watch?v=10zyL1YY2rk and http://www.youtube.com/watch?v=r3C5nHdP3ps
Yeah, I hear this one is a pretty hard model to do. Granted, given myBrimstone wrote:Spring into action is not an easy model, the collapsing gives trouble to most folders who try it.
The best videos I've seen for it are:
http://www.youtube.com/watch?v=10zyL1YY2rk and http://www.youtube.com/watch?v=r3C5nHdP3ps
Little amount of experience, I'm probably Ina little over my head. But I'm going to persist. I know how to collapse it now, but I'm having trouble actually doing it. I'll try again tomoorow. Each time I have tried, I haven gotten closer, so maybe third times a charm. Thank you very much for the links.
hi

Three differences from most Origami models:
1. Rather than printer paper, use something a little stiffer [like Kareshi wrote], such as thin card stock similar in stiffness to some advertising brochures. It shouldn't be too stiff either, because you can't fold it.
2. The model is not very forgiving, so the creases should be very precise.
The diagonals tend to be a bit more difficult. You might use an old ball point pen to score the paper before folding.
3. As easily overlooked in the instructions (and the videos), you have to remember to pull the flap out of the first disk, twist each successive disk counterclockwise or clockwise, in turn, (depending on how you start), and tuck the upper edge or the lower edge into the pocket, successively. Sorry to be confusing, but directions depend on how you fold it... I've listed the conventional fold from p. 156 in Lang's Origami in Action.
Plan to fold a few of these while following the videos (I prefer the 2nd, because he had lots of trouble, so you can see how to fix problems.)
If you can, post a movie of your working model....
- Hank Simon
I have been using normal typing paper, i will try to use some thicker paper. The first disc i can get, but one the second ring, i can only twist and collapse it about 3/4 of the way before i mess up completely and end up wrinkling the paper. Ill try again with some heavier paper. thanksHankSimon wrote:Three differences from most Origami models:
1. Rather than printer paper, use something a little stiffer [like Kareshi wrote], such as thin card stock similar in stiffness to some advertising brochures. It shouldn't be too stiff either, because you can't fold it.
2. The model is not very forgiving, so the creases should be very precise.
The diagonals tend to be a bit more difficult. You might use an old ball point pen to score the paper before folding.
3. As easily overlooked in the instructions (and the videos), you have to remember to pull the flap out of the first disk, twist each successive disk counterclockwise or clockwise, in turn, (depending on how you start), and tuck the upper edge or the lower edge into the pocket, successively. Sorry to be confusing, but directions depend on how you fold it... I've listed the conventional fold from p. 156 in Lang's Origami in Action.
Plan to fold a few of these while following the videos (I prefer the 2nd, because he had lots of trouble, so you can see how to fix problems.)
If you can, post a movie of your working model....
- Hank Simon
hi
-
Razzmatazz

- Forum Sensei
- Posts: 892
- Joined: March 20th, 2009, 6:25 pm
- Location: Canada
Okay first of all, all this about this being "tricky" is un-true.
You need to know the trick to it. I have made many of these (after all many kids I have taught origami to end up wanting one of these) and so I may have a little handicap to it since I have done it frequently.
I'll try my best to explain though. After you get the first section out of the 6 twisted, you will have done the 2nd hardest part (hardest for me is finishing it off). To do the next section reinforce the creases and act like you are collapsing each of the 12 rows one at a time. You will get to a point where it's hard to fold the middle rows so continue from the other side and do as many as you can.
After that twist the spring slowly so that it starts collapsing. Then you can poke in any parts that should be folding and it will slowly go down. After this you do the next couple sections.
When you try your spring out after finishing it, you will notice that it my not open and collapse. This is because some of the layers are in the wrongs spots. You will notice the mechanics of the spring is that a dual layer circle gets put inside an open two layer pocket when expanded. You will need to shift the layers around to achieve this sometimes due to improper assembly.
Hopefully what I said made sense. Sorry if it didn't
-
Brimstone
- Buddha
- Posts: 1729
- Joined: November 23rd, 2004, 3:59 am
- Location: Colombia, South America
- Contact:
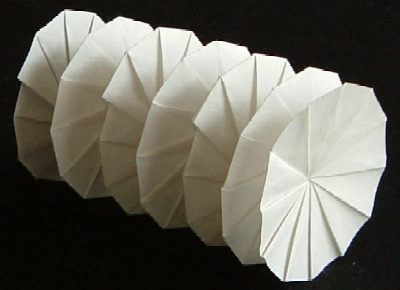
Another thing that could help is doing a simplified version of it so that you understand how it works. Once you've learned its tricks, you can try the full version.
By simplified I mean doing the model from the same size of paper but doing only 6 x 6 divisions (take into account that the 1/6 of one side is not the same lenght as the 1/6 of the other side). You'll end up with something like this:

By simplified I mean doing the model from the same size of paper but doing only 6 x 6 divisions (take into account that the 1/6 of one side is not the same lenght as the 1/6 of the other side). You'll end up with something like this: