Any Help will be much Appreciated.
Help Me Understand.
Forum rules
READ: The Origami Forum Rules & Regulations
READ: The Origami Forum Rules & Regulations
Help Me Understand.
Hello Basically I want to Learn more about Box Pleating and Circle Packing. I need Help and Pictures and Diagrams and Books and Videos Etc Etc to Learn more about it I want to understand Crease Patterns so say like I have a complex Crease Pattern in front of Me I want to know what to look for and how it would fold up in to the Base.
Any Help will be much Appreciated.

Any Help will be much Appreciated.
-
phillipcurl
- Moderator
- Posts: 1657
- Joined: October 25th, 2011, 2:51 pm
- Location: Senoia, GA
- Contact:
Re: Help Me Understand.
Alright, so to get started, lets look at a very simple crease pattern.
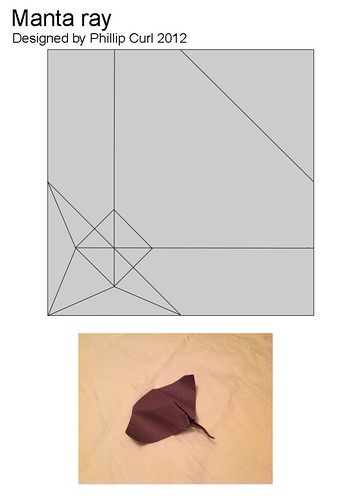
Manta ray crease pattern by Phillip Curl, on Flickr
You'll probably notice that the long, 90* creases lie on 4ths, along with the diagonal crease along the top. Also, you'll notice the half-bird base one the bottom left of the crease pattern. The square running around the center of the half-bird base is a closed-sink.
So to start folding, you divide the paper in half horizontally and vertically, marking the edges. Fold the top corner down to those marks, and the bottom edges up to them, forming a rabbit ear. To get the bird base, squash the triangle of paper created from the rabbit ear into a preliminary fold, and then reverse fold the edges to the center.
That is as far as the crease pattern for any model will take you; the base. From that point on, you have to use the artistic abilities you have gained from folding diagrams to get you to the finished model. There is no right or wrong way to do this, it is left entirely up to you.
So that is 22.5, so what about a circle packing model?
My praying mantis would be a good example of that, though a rather difficult one. In this model, there is a river going through the middle of the gussets, making them abnormal. They also have a really weird folding sequence in the diagrams. In 99.9999% of circle packing CP's, the thinning WILL NOT BE INCLUDED. This is simply to minimize confusion, most stuff is thinned on multiples of 2 anyways.

praying mantis 1.1 crease pattern by Phillip Curl, on Flickr
With circle packed CP's, you usually (just kidding. all the time) will have to measure and mark to some insane references. Before looking at the partial diagrams below, try and locate the major (axial) creases in the crease pattern. Found them?

I already listed the measurements for the ease of the folder, but to get those you measure the length of your square, lets say it was 3, and then the length to the reference point you want to get. Lets make that 1.
You divide 1/3, which is approximately .33, or thirds. You can either plug the x/y coords into reference finder (a very useful program, by the way) or just measure to the point with a ruler. You have to do some simple algebra, though, to find the actual measurement.
Multiply the measurements I gave you in the diagrams by the length of your square, or the length of the crease that the point is located on (that is why I put the vertical crease in the center of the paper. It simplifies everything. Alternatively, plug the numbers into reference finder). After you have done that, the rest of the creases in the CP come very easily, and you can actually begin collapsing after step 6.
Make sense?
Now for box pleated crease patterns:
BP are pretty simple to fold and solve, but the most time consuming if all the three methods because of the annoying grids you have to fold. To begin, simply fold the grid (can be diagonal or horizontal grids). You can find the number of segments to divide the paper into by counting up to the middle line, and then multiplying that by 2. After you have the grid, just start filling in the creases;(I usually fold them all for accuracy, but you don't necessarily have to.) they are usually located on 22.5 degrees.
Good luck, if you have more questions I'm sure someone is glad to help.
Manta ray crease pattern by Phillip Curl, on Flickr
You'll probably notice that the long, 90* creases lie on 4ths, along with the diagonal crease along the top. Also, you'll notice the half-bird base one the bottom left of the crease pattern. The square running around the center of the half-bird base is a closed-sink.
So to start folding, you divide the paper in half horizontally and vertically, marking the edges. Fold the top corner down to those marks, and the bottom edges up to them, forming a rabbit ear. To get the bird base, squash the triangle of paper created from the rabbit ear into a preliminary fold, and then reverse fold the edges to the center.
That is as far as the crease pattern for any model will take you; the base. From that point on, you have to use the artistic abilities you have gained from folding diagrams to get you to the finished model. There is no right or wrong way to do this, it is left entirely up to you.
So that is 22.5, so what about a circle packing model?
My praying mantis would be a good example of that, though a rather difficult one. In this model, there is a river going through the middle of the gussets, making them abnormal. They also have a really weird folding sequence in the diagrams. In 99.9999% of circle packing CP's, the thinning WILL NOT BE INCLUDED. This is simply to minimize confusion, most stuff is thinned on multiples of 2 anyways.
praying mantis 1.1 crease pattern by Phillip Curl, on Flickr
With circle packed CP's, you usually (just kidding. all the time) will have to measure and mark to some insane references. Before looking at the partial diagrams below, try and locate the major (axial) creases in the crease pattern. Found them?
I already listed the measurements for the ease of the folder, but to get those you measure the length of your square, lets say it was 3, and then the length to the reference point you want to get. Lets make that 1.
You divide 1/3, which is approximately .33, or thirds. You can either plug the x/y coords into reference finder (a very useful program, by the way) or just measure to the point with a ruler. You have to do some simple algebra, though, to find the actual measurement.
Multiply the measurements I gave you in the diagrams by the length of your square, or the length of the crease that the point is located on (that is why I put the vertical crease in the center of the paper. It simplifies everything. Alternatively, plug the numbers into reference finder). After you have done that, the rest of the creases in the CP come very easily, and you can actually begin collapsing after step 6.
Make sense?
Now for box pleated crease patterns:
BP are pretty simple to fold and solve, but the most time consuming if all the three methods because of the annoying grids you have to fold. To begin, simply fold the grid (can be diagonal or horizontal grids). You can find the number of segments to divide the paper into by counting up to the middle line, and then multiplying that by 2. After you have the grid, just start filling in the creases;(I usually fold them all for accuracy, but you don't necessarily have to.) they are usually located on 22.5 degrees.
Good luck, if you have more questions I'm sure someone is glad to help.